


Photographing Your Art for Applications: 2026 Guide
- admin60709
- Aug 1
- 13 min read
Your application photos are your silent interview with the jury. Before a single juror reads your artist statement or learns your name, they've already formed an opinion based on one thing: the images you submitted. Knowing how to take photos of your art for applications isn't just a technical skill; it's the difference between a rejection email and a coveted 10x10 booth space at one of Florida's premier festivals.
If you've ever submitted what felt like a strong application, only to hear nothing back, you're not alone. Glare washing out your paintings, colors that look nothing like the original, blurry details on intricate jewelry, confusing file format requirements — these are the silent killers of otherwise brilliant applications. Your work deserves better than a photo that undersells it.
This 2026 guide gives you a clear, step-by-step workflow to capture jury-ready images that truly represent your craft. We'll cover lighting setups, color accuracy, camera settings, and file preparation so you can walk into the next Florida festival application cycle with total confidence. Let's get your work the spotlight it deserves!
Table of Contents
Why Your Art Photography Can Make or Break Your 2026 Application!
Think about what a juror actually sees when your application lands in their queue. Not your years of practice. Not the texture of your brushwork or the weight of your hand-thrown ceramic. Just a photo on a screen. That single image carries the entire burden of representing your talent, your professionalism, and your fit for a premier Florida festival. The stakes couldn't be higher.
Florida's festival circuit has grown intensely competitive. Events organized by Latitude-88, Inc. attract enormous crowds, which means booth spaces are coveted and jury panels are selective. Knowing how to take photos of your art for applications isn't a nice-to-have skill anymore. It's a baseline requirement if you want a serious shot at securing that 10x10 booth space.
High-quality photography also signals something beyond the art itself. It tells organizers you're a reliable, professional vendor who takes presentation seriously. A polished image says: I show up prepared. A blurry, poorly lit snapshot says the opposite, regardless of how extraordinary the actual work is.
The Juror's Perspective: What They Look For
Jurors aren't just evaluating individual pieces. They're scanning for a cohesive brand across your entire portfolio. Ask yourself: do your images feel like they belong together? Beyond consistency, they're looking for clarity that lets them feel the texture of your work through a screen. A photograph of an intricate mosaic should make a juror lean in. It should communicate detail, dimension, and craft. Presentation that matches the high-energy, celebratory atmosphere of a Florida expo tells jurors your booth will deliver that same experience to thousands of attendees.
Common Pitfalls That Lead to Rejection
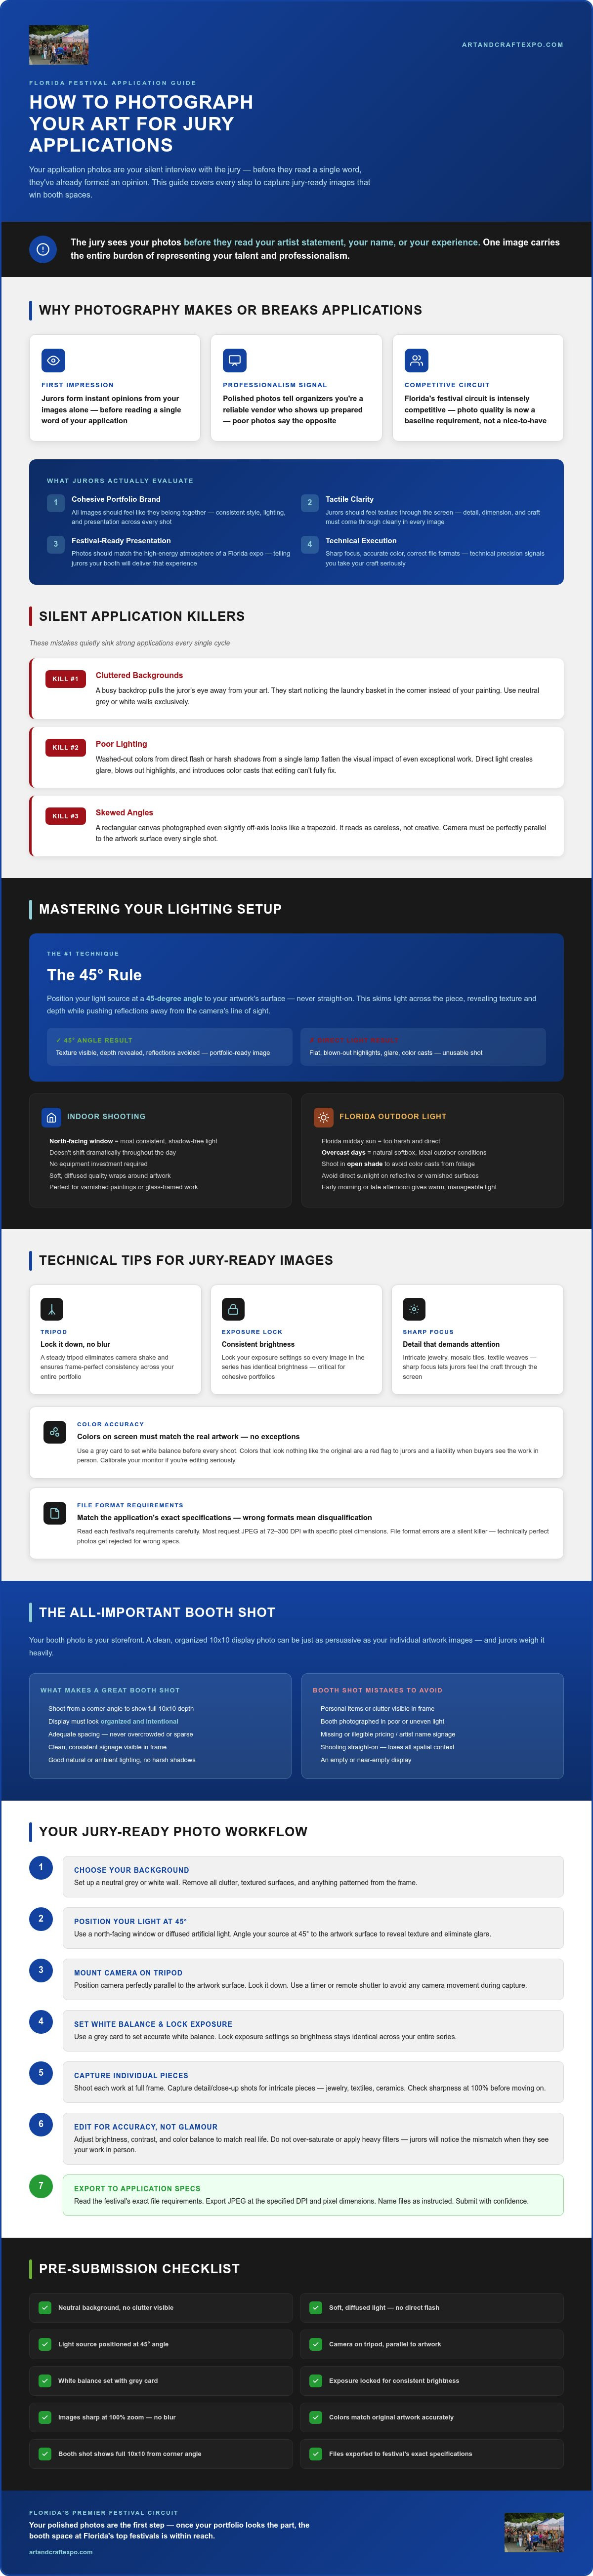
These are the mistakes that quietly sink strong applications every single cycle:
Cluttered backgrounds: A busy backdrop pulls the eye away from your art. Jurors start noticing the laundry basket in the corner instead of your painting.
Poor lighting: Washed-out colors from direct flash or harsh shadows from a single lamp flatten the visual impact of even exceptional work.
Skewed angles: A rectangular canvas photographed even slightly off-axis looks like a trapezoid. It reads as careless, not creative.
Understanding how to take photos of your art for applications means eliminating every distraction between your work and the juror's first impression. Get that right, and the rest of your application gets a fighting chance!
Mastering the Setup: Perfect Lighting and Neutral Backgrounds
Great lighting isn't about having expensive equipment. It's about understanding how light behaves and positioning yourself to use it strategically. The single most common reason technically sound artwork fails in jury review? Glare, hot spots, and color shifts that a better setup would have eliminated entirely. Getting your environment right before you ever pick up a camera is the foundation of knowing how to take photos of your art for applications.
The goal is soft, diffused light that wraps around your work without creating reflections or harsh shadows. Direct light, whether from a flash, a bare lamp, or the Florida midday sun, creates exactly the opposite effect. It flattens dimension, blows out highlights, and introduces color casts that no amount of editing can fully correct.
The 45-degree rule is your first practical fix. Position your light source at a 45-degree angle to the surface of your artwork rather than pointing it straight on. This angle skims light across the piece, revealing texture and depth while pushing reflections away from the camera's line of sight. For varnished paintings or work behind glass, this technique alone can transform an unusable shot into a portfolio-ready image.
Your background matters just as much as your light. A neutral grey or white wall eliminates visual competition, keeping the juror's eye locked on your work. Avoid textured walls, colored surfaces, or anything patterned. Clean and simple wins every time.
Indoor vs. Outdoor Shooting in Florida
Florida's light is intense, and that intensity is both a gift and a challenge. Indoors, a large north-facing window provides the most consistent, shadow-free light available without any equipment investment. North-facing light doesn't shift dramatically throughout the day, which means your shots stay consistent across a full session.
Outdoors, avoid shooting between 10 a.m. and 3 p.m. The midday sun creates blown-out highlights that erase detail in lighter-toned work. A screened-in porch on a slightly overcast afternoon is genuinely one of Florida's best-kept photography secrets. The screen diffuses the light naturally, mimicking a professional softbox at zero cost. Humidity is a real concern outdoors; give your lens at least 15 minutes to acclimate when moving from air conditioning to the outside air, or condensation will blur your shots before you even notice it forming.
Choosing the Right Background for Your Medium
2D Art (paintings, prints, photography): Hang work at eye level against a flat, neutral wall. Ensure it's perfectly level before shooting. Even a slight tilt reads as careless to a juror scanning dozens of applications.
3D Work and Crafts: Use a paper sweep, a continuous curved sheet of paper that eliminates the horizon line between wall and surface. This creates a seamless, floating effect that keeps focus entirely on the piece.
Jewelry: A dedicated light box is worth every penny here. It surrounds small, reflective pieces with even light from multiple angles, capturing sparkle and detail without the glare that kills intricate metalwork in standard shots.
Once your setup is dialed in, your images will start doing the heavy lifting your artist statement can't. Artists who present polished, professional portfolios are exactly who Florida's premier festival circuit is looking for when filling coveted 10x10 booth spaces each season!
Capturing the Shot: Technical Tips for Jury-Ready Images
Your lighting is dialed in. Your background is clean. Now it's time to pick up the camera and get it right technically, because even a perfectly staged setup falls apart if the shot itself is shaky, overexposed, or the wrong color. This is where knowing how to take photos of your art for applications moves from environment into execution.
Start with a tripod. No exceptions. Hand-holding a camera introduces micro-vibrations that blur fine detail, and jurors will notice soft edges on intricate work immediately. A tripod also forces you to slow down, check your framing carefully, and lock in a consistent angle across your entire portfolio. Consistency signals professionalism. It tells a jury your work belongs together.
Next, take control of your exposure and focus instead of letting your camera guess. Modern cameras and smartphones are programmed to expose for an average scene, which means a dark oil painting on a white wall will confuse the meter every time. On a DSLR or mirrorless camera, switch to manual mode or use exposure lock. On a smartphone, tap directly on the artwork to set the focus point, then slide the exposure slider down slightly if the background is bright. Lock both settings before you shoot.
Resolution matters too. For 2026 digital applications, shoot at the highest quality your device allows. Most festival portals specify minimum file sizes, so check the specific requirements for each application before submitting. Shooting large gives you room to crop without losing detail. You can always reduce a file; you can't recover pixels that were never there.
Color accuracy is the technical detail that trips up even experienced artists. Your "Ocean Blue" glaze shouldn't arrive on a juror's screen looking like "Forest Green." A grey card or white balance tool is the fix. Before your session, photograph a neutral grey card under your shooting light, then use that reference image to set a custom white balance in your camera or correct the color in editing. It takes two minutes and saves your portfolio from color shifts that misrepresent your work entirely.
Smartphone Photography for Artists
A modern smartphone is genuinely capable of producing jury-ready images with the right technique. Clean your lens first. It sounds obvious, but pocket lint and fingerprints are the most common cause of hazy, soft images that get blamed on the phone itself. Use the 2x or 3x optical zoom instead of the default wide-angle lens; the wide lens distorts edges and bows straight lines in a way that makes rectangular canvases look warped. And turn off the flash entirely. Built-in flash creates harsh glare and blows out color accuracy in ways that no filter can fix.
The Composition Checklist
Before you press the shutter, run through this quick checklist every single time:
Fill the frame: Your artwork should occupy roughly 80 to 90 percent of the image. Too much empty space around the piece reads as hesitant and makes detail impossible to evaluate.
Level the camera: Your lens must be parallel to the surface of the artwork. Any tilt, up, down, or sideways, turns squares into trapezoids and signals carelessness to a jury scanning dozens of portfolios.
Straighten vertical and horizontal lines: Use your camera's grid overlay to align the edges of your work with the frame. If the lines aren't straight in-camera, correct them in editing before submitting.
Nail these technical fundamentals, and your images will stand out for exactly the right reasons when Florida's premier festival juries start evaluating the 2026 application cycle!
Editing and the All-Important Booth Shot
Capturing the raw image is only half the job. What happens next, in editing and file preparation, determines whether a technically sound photo becomes a jury-ready submission or a missed opportunity. And there's one image that most online guides completely skip over: the booth shot. For Florida festival applications, this single photo can be just as decisive as your individual artwork images.
Nailing the Booth Shot for Florida Festivals
Your booth photo is your storefront. It's the image that tells a jury whether you'll enhance the atmosphere of their event or blend into the background. Set up your complete 10x10 craft booth setup in your driveway, a local park, or any open outdoor space with clean surroundings. The goal is a shot that shows three walls of displayed work, demonstrating a full, professional inventory that fills the space confidently. No people in the frame. No cars, trash cans, or neighborhood clutter creeping into the background. Crop or reposition until the booth itself is the only story being told.
Think of it this way: a juror scanning dozens of applications wants to visualize your booth on their festival grounds. Give them a complete, compelling picture. A sparse or disorganized booth shot signals that you might not be ready for a premier event. A polished, fully stocked display signals the opposite immediately.
Simple Editing Tools for Every Artist
You don't need professional editing software to produce jury-ready images. Your phone's built-in editor handles brightness, contrast, and saturation adjustments well enough for most corrections. For cropping to specific pixel dimensions required by application portals, free tools like Canva or Pixlr give you precise control without a learning curve.
The key distinction when learning how to take photos of your art for applications is understanding the difference between color correction and color manipulation. Correction means adjusting the photo so it accurately matches the physical piece. Manipulation means changing how the artwork actually looks. The first is not only acceptable but necessary; the second is misrepresentation. Apply the "Truth Test" before every submission: hold your screen next to the actual piece in natural light. If the colors, values, and details match, you're done. If they don't, keep adjusting until they do.
File preparation is where many strong applications stumble at the finish line. Always read the art festival exhibitor application requirements before exporting anything. File size minimums, maximum dimensions, accepted formats like JPG versus PNG, and naming conventions vary between portals. Name your files clearly and consistently, for example "LastName_FirstName_Image1.jpg" unless the application specifies otherwise. Submitting a file that gets rejected on a technicality after all this preparation is entirely avoidable.
Get your booth shot polished and your files prepped correctly, and you're ready to compete for a coveted space on Florida's premier festival circuit. Explore available 10x10 booth spaces with Art and Craft Expo and put your best work in front of the audiences it deserves!
Ready to Apply? Join the Best Festivals in Florida!
You've done the hard work. Your lighting is dialed in, your booth shot is polished, and your files are prepped to spec. Now comes the part that actually matters: putting those images in front of the right audience. Knowing how to take photos of your art for applications is only valuable when you use that skill to walk through an open door. Florida's festival circuit is that door, and it's wide open for 2026.
Why Exhibit with Art and Craft Expo?
Art and Craft Expo, organized by Latitude-88, Inc. since 2011, brings together artists and crafters at high-traffic locations across Florida's most vibrant communities, from Vero Beach and Stuart to Melbourne and Orlando. These aren't quiet neighborhood markets. They're lively, festive events filled with live music, family entertainment, and crowds that come ready to buy. Attendees at these festivals are actively seeking unique, handmade goods and original artwork, which means your booth isn't competing against a big-box store. It's competing for the attention of buyers who already want exactly what you make.
The atmosphere matters too. A buying crowd in a celebratory setting responds differently than a casual browser at a weekend market. Florida's premier festival circuit creates the energy that converts foot traffic into real sales. Artists who show up with a professional, fully stocked 10x10 booth consistently report strong returns because the environment is built to support them.
Want to maximize your visibility even further? A corner booth upgrade puts your work at the intersection of two high-traffic aisles, giving you exposure from multiple directions simultaneously. It's one of the smartest investments a returning exhibitor can make.
Start Your 2026 Application Today!
Getting started is straightforward. Here's your action plan:
Check the calendar first: Review the Florida craft show calendar to find upcoming events that fit your schedule and target market.
Gather your images: Pull together your best high-resolution artwork photos and your polished booth shot. Everything you've learned about how to take photos of your art for applications comes into play right here.
Submit your application: Head to the Art and Craft Expo application portal and put your best work forward with confidence.
Exhibitor support is a genuine priority here. The Latitude-88 team treats every artist and crafter as a valued partner, not just a booth fee. That relationship matters when you're building a brand across multiple seasons and locations in the Sunshine State.
Your work is ready. Your photos are ready. Now it's time to claim your space on Florida's premier festival circuit and get your art in front of the audiences it deserves!
Your Best Work Deserves to Be Seen. Make It Happen!
Great art photography isn't about gear. It's about intention. When you nail your lighting, shoot with precision, edit for accuracy, and present a polished booth shot, you're not just submitting images. You're telling a jury: I'm ready. Knowing how to take photos of your art for applications is the skill that turns a strong portfolio into an accepted application.
The path forward is clear. Diffused light eliminates glare. A steady tripod eliminates soft edges. Accurate color correction eliminates misrepresentation. And a compelling booth shot seals the deal. Put all of that together, and your 2026 application stands on its own.
Art and Craft Expo, organized by Latitude-88, Inc. since 2011, has spent over 15 years building premier festival experiences across Vero Beach, Stuart, Orlando, and beyond. These high-traffic events are designed around one priority: artist and crafter success. Your next audience is already showing up. Your booth space is waiting.
Apply Now for Our Next Florida Art and Craft Festival! Your work is ready. Go claim the spotlight it deserves!
Frequently Asked Questions About How to Take Photos of Your Art for Applications
Can I use my smartphone to take professional application photos?
Yes, a modern smartphone is genuinely capable of producing jury-ready images with the right technique. Clean your lens before every session, use the 2x or 3x optical zoom to avoid edge distortion from the wide-angle lens, and always turn off the flash. Tap directly on your artwork to lock focus and exposure, and mount your phone on a tripod to eliminate any shake that softens fine detail.
What is a booth shot and why do I need one for Florida festivals?
A booth shot is a photograph of your fully set-up 10x10 display, and most Florida festival applications require one alongside your individual artwork images. It shows jurors that you can fill a space professionally and create an inviting, cohesive presentation for attendees. Set up your complete display in a clean outdoor location, shoot from straight on to show three walls of work, and keep people, vehicles, and background clutter completely out of the frame.
How do I avoid glare when photographing paintings under glass?
Position your light source at a 45-degree angle to the painting's surface rather than pointing it straight on. This pushes reflections away from the camera's line of sight instead of directly into it. If glare persists, try tilting the top of the frame very slightly forward, just a degree or two, which changes the angle of the glass surface relative to your light source and often eliminates the remaining hot spots without distorting the image.
What file size and format should I use for art show applications?
JPG is the most widely accepted format across festival application portals, and most platforms specify a minimum file size to ensure sufficient image quality for jury review. Always read the specific requirements for each application before exporting your images, because minimums and maximum dimensions vary between portals. Shoot at the highest resolution your device allows, then resize down to match the specs. You can reduce a file; you can't recover pixels that were never captured.
Is it better to photograph art indoors or outdoors?
Both settings can produce excellent results when you understand the trade-offs. Indoors, a large north-facing window delivers consistent, diffused light that doesn't shift dramatically throughout the day. Outdoors, a slightly overcast afternoon gives you naturally soft, even light that flatters almost any medium. Avoid direct midday sun regardless of setting, and if you're shooting outside in Florida, give your lens time to acclimate after coming from air conditioning to prevent condensation blur.
Should I include the frame in my application photos?
It depends on whether the frame is part of the artwork's presentation. If you sell your pieces framed and the frame contributes to the overall aesthetic, include it. If the frame is a standard off-the-shelf addition that doesn't reflect your work, consider photographing the piece unframed so the art itself commands full attention. Either way, ensure the frame doesn't introduce glare or draw the juror's eye away from the work itself.
How many photos do I typically need for a festival application?
Most festival applications request between three and five individual artwork images plus one booth shot, though requirements vary by event. Check each application's specific instructions before preparing your portfolio. When selecting which pieces to submit, prioritize images that feel cohesive as a set. Jurors evaluate your work as a collection, so five images that tell a unified story about your style will outperform five technically strong photos that feel unrelated to each other.
What should I do if my colors don't look right on the screen?
Start by calibrating your white balance at the time of shooting using a neutral grey card as a reference. If your colors still look off during editing, apply the "Truth Test": hold your screen next to the actual piece in natural light and compare them directly. Adjust brightness, white balance, and saturation in small increments until the screen matches the physical work. Knowing how to take photos of your art for applications means correcting for accuracy, not enhancing beyond what the piece actually looks like.


Comments